What is texturing in 3D animation?
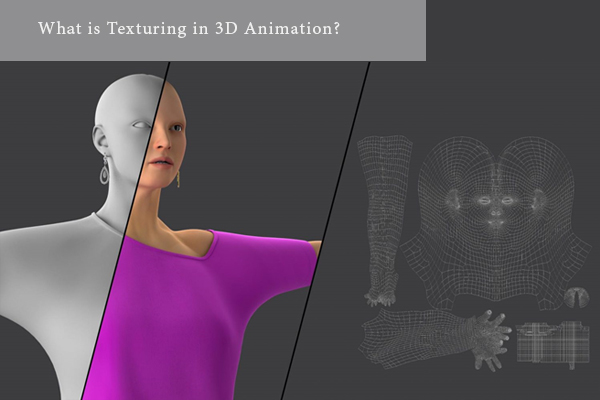
Objects created in the 3D modeling component of the 3D pipeline are usually in a program’s default flat gray color. 3D texturing is in fact the art of clothing the 3D models with 2D images. Texture artists are responsible for applying color and surface attributes to 3D objects. The general objective is to make the model’s surface match its concept art design or real-world counterpart.
For instance, if the model is supposed to represent a brick wall, the task of the texture artist would be making sure the 3D brick wall shares the same color and surface properties of a real-world brick wall when rendered. The same example can be made with a wooden table or a shiny glass window.

What are some common 3D texturing techniques?
Generally, 3D texturing is supposed to portray three main properties of every surface in a 3D environment:
- Material
Texture, to a huge extent, can give the viewer a sense of material about an object in a 3D world. 3D texturing’s primary objective is to show the viewers a sense of what the object is actually made of by looking at it.
- Light effects
In the real world, every object portrays unique properties when exposed to light; such as reflection, refraction, anisotropy, and so on. The same properties must be applied to 3D objects of the same material in a 3D animated world.
- Tertiary details
If every single detail on the surface of a 3D object were to be created in the 3D modeling phase, processing the objects would be a real burden for both 3D software and of course the 3D artist. 3D texturing provides a solution for this problem: It allows us to create small details such as wrinkles, scars, cracks, bumps, etc. on the surface of the models without imposing much pressure on hardware or software. Different types of textures and texture mapping can be used to make a 3D model look more realistic in a 3D environment.
3D texturing workflow breakdown; 3D step process
Every animation studio or 3D artist can adopt a slightly different workflow to reach the same results. Here in Dream Farm Animation Studios, the 3D texturing workflow is usually as follows:
- Unwrapping
To start the 3D texturing process, you need to unwrap the model first; which basically means unfolding a 3D mesh. Texture artists will create a UV map for each 3D object as soon as they receive the final models from the 3D modeling department. SUVs are in fact 2D representations of 3D models. UV mapping will help wrap a 2D image (texture) around a 3D object by directly relating it to vertices on a polygon. The resulting map will be directly used in the process of texturing and shading.
Besides exclusive applications, most 3D software packages such as Autodesk Maya provide a few tools or techniques to unwrap 3D models. Choosing the right tool to create UV maps is a matter of preference or compatibility.
Unwrapping a 3D model in the texturing component is most often a must; unless you want to use other options such as procedural textures. These are 2D or 3D textures created using a mathematical algorithm (procedure) rather than directly stored data.
Most unwrapping is done manually in Dream Farm Studios; especially for characters. Manual unwrapping methods might take a little bit longer, but make the painting process much easier. Automatic methods are also available and can be useful for less important objects like background props.
- Texture painting and shading
Correct display of an objects’ overall look and its interaction with light is a key step towards its believability and appeal. The wrong material or surface properties can end up being rejected by the viewer’s mind. This sums up the overall purpose of the texturing and shading process, going hand-in-hand. The texture is usually a 2D image and shading is a group of functions that determines the way light affects the 2D image.
The process of defining color information, surface details, and visual properties of a 3D model is called “texture mapping”. Texture maps most used by Dream Farm texture artists include a Base Color map, Normal map, Height amp, Diffuse map, Specular map, Roughness map, and Self-Illumination map. There are tons of other texture maps as well, including Ambient occlusion map, Displacement map Specularity/reflection map, Roughness/glossiness map, Metalness map, Refraction map, etc.
- Lighting & Rendering
In short, the process of calculating the different maps assigned to the object’s shader and also the lights is called rendering. Generally speaking, texturing, 3D lighting, and rendering processes relatively rely on each other. So it is important to choose your texture maps based on the preferences of the render engine you’ll be using at the end of the production stage.
- Texture mapping
As Wikipedia puts it: “Texture mapping is a method for defining high-frequency detail, surface texture, or color information on a computer-generated graphic or 3D model. The original technique was pioneered by Edwin Catmull in 1974.”


